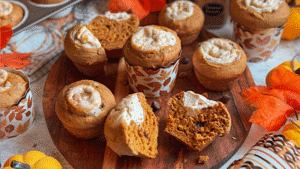


Peanut Butter and Chocolate Spread Rolls
This is a sponsored post written by me on behalf of PB2 Foods. All opinions are entirely my own
Wouldn’t you agree that just about anyone would love to wake up to a freshly baked batch of Peanut Butter and Chocolate Spread Rolls?
Mmhm! My family was, undoubtedly fortunate during the process of testing the recipe for these rolls.
I have been making them nearly for two weeks. Ever since I partnered with PB2 Foods this past summer, I have been using their products to test all kinds of sweet and savory recipes.

I have loved their products even before this collaboration, so I feel great when working with a brand that I absolutely enjoy using.
Anyhow, you all know how much I love Peanut Butter, so this way, I can use it in a powder form in my smoothies, baked and none-baked goods, as well as savory dishes with it being literally mess-free.
Speaking of baked goods, these rolls started as PB2 Powder, quickly made into a PB spread and used with raspberry jam. The thought of this dish makes my mouth water.

However, when I made these with chocolate spread, all my team of qualified taste-testers agreed that they were so much better than one with jam. The sad part was I decided with them.
I mean, they were delicious, but the Peanut Butter and chocolate spread rolls tasted significantly better. You see, I am trying to create recipes that you would enjoy too. That is why I taste test recipes with my team so all of you can enjoy them as well.
Now that the Holiday season is upon us, a cozy aroma will wrap around your whole kitchen like a warm blanket and make your home that much more pleasant and warm.
Don’t you just love this time of the year?

This time around, I used PB2 Pure Peanut Powder which is great for baking. PB2 Pure is the original PB2 formula reimagined down to its essence. This is literally a single-ingredient product – just 100% all-natural roasted peanuts, and that is it. No added sugar, no added salt, no added preservatives.
It is kosher, vegan, and gluten-free: Not only are PB2 products void of any GMOs, but they also work well with a wide variety of dietary preferences.
You guys must try these tasty Peanut Butter and Chocolate Spread Rolls. Please remove your ads to watch a video on how to make these rolls. Thank you!

Other Recipes you might like:
PB2 GLUTEN-FREE CHOCOLATE WAFFLES
NO BAKE SWEET FRUIT PIZZA
TOFU AND VEGGIE STIR-FRY WITH PEANUT BUTTER SAUCE

Peanut Butter and Chocolate Spread Rolls
Easy, warm, and tasty peanut butter and chocolate rolls.
Ingredients
STARTER
- 1 envelope dried yeast
- 1 teaspoon sugar
- 1/4 cup milk, warm to the touch
DOUGH
- 4 cups all-purpose flour (500g/1 lb.), plus a few tablespoons more for dusting working area
- 1/2 teaspoon salt
- 1/4 cup granulated sugar
- 2 tbsp PB2 Pure Peanut Powder
- 2 large eggs, well beaten
- 3/4-1 cup warm milk (or water)
- 2 tablespoons softened unsalted butter
- 1 tablespoon oil, plus for greasing bowl for the dough
FILLING
- 8 tbsp PB2 Pure Peanut Powder + Water
- 1/4-1/2 cup Chocolate Spread
PB-CREAM CHEESE ICING OPTION
- 1 block cream cheese, room temperature
- 2 tablespoons unsalted butter, softened
- 1/4 cup powdered sugar
- 1 teaspoon vanilla extract
- 2 tbsp PB2 Pure Peanut Powder
CLASSIC ICING
- 2 tablespoons heavy whipped cream
- 1/4 cup powdered sugar, more if needed
- 1 tsp vanilla extract
Instructions
ACTIVATE YEAST
- It is not necessary if you have instant dry yeast, but I like to do it. So warm up milk for about 20 seconds in the microwave-safe bowl or a cup until warm to touch, then add sugar and dried yeast.
- Mix and allow the yeast to start to bubble.
- When you see yeast get bubbly and thicken on the top it is ready. It usually takes about 3-5 minutes, depending on the temperature. Never use hot milk or water.
PREP DOUGH
- Measure and combine flour, salt, sugar, PB2 Pure Peanut
Powder, etc. Mix it together. - Add activated yeast.
- Using the kneading attachment of your mixer start mixing slowly while adding 2 mixed or beaten eggs, room temperature/soften butter, and the rest of the warm milk.
- Adjust mixer to a higher speed and keep kneading for about 3-4 minutes or until the dough is
becoming a ball and pulling away from the sides of the mixer bowl. - Do not overmix, there is no need. The dough will be softer on the touch. Oil dough and cover. Place dough either in the oven or microwave so it could rise. If your oven has a proof setting this is a perfect time to use it, if not just keep it in the turned-off oven. Allow it to rise for the first time for about 45 minutes to up to 1 hour.
- It will double in size. Knead, then allow it to second proof for another 45 minutes, knead. This is the time to place in the fridge for about 6-8 hrs./overnight before making rolls.
NOTE: You do not have to chill the dough however they do come out so much better, plus it is easier to roll out. After chilling, let it sit at room temperature for about 10 minutes before rolling out. This is optional!
FILLING
- Split the dough into two equal parts. Roll out dough to 1/4 inch thick. The size is approximately (38cm) 15 inches wide and (53cm) 21 inches long. You do not have to split dough, but I liked these smaller rolls.
- Mix PB2 Powder with water to create spreadable Peanut Butter. Follow the directions in the back of the package. The spread needs to be just a bit thinner, so considers adding a tablespoon or two more.
- It would really be hard to spread it is not. On top of PB spread, evenly add chocolate spread. You can add chopped nuts if you prefer.
- Slowly roll the dough until you reach the end. Pull ends to have an even end. Slice it in half, then cut the cylinder into equal slices. These
two dough parts make 20-22 smaller rolls. - Place cut side up and evenly spaced 9 x 13-inch baking dish.
- Cover pan with a cotton towel and set aside in a warm place to let rise for at least 30 minutes to one hour. if you have an oven with a proof setting place in the preheated oven for proof.
BAKING
Preheat oven to 375F and bake them for 25 minutes. This also
depends on your oven, and baking dish.
NOTE: If you are baking in the ceramic dish, then bake at a lower temperature, I would do the same if you choose to bake it in cast iron, however, for a regular metal/nonstick baking dish, bake at 375F for about 25 to 27 minutes, or until they are golden brown.
ICING
- While the rolls are baking make the icing. I like it with a cream cheese-based, so you would just mix it together until nicely blended. I added PB2 Powder for a delicious warm peanut butter taste. If you prefer regular classic icing, then whisk together the
cream, sugar, and vanilla in a small bowl until smooth. - Transfer the pan of cinnamon rolls to a cooling rack. Let cool for at least 5 minutes. Drizzle or spread the icing all over the rolls and serve immediately.
- Keep in the fridge after they
cool down for 3 days. Reheat before eating for the best taste.
 Mini Sunday Brunch Casseroles
 Mushroom and Leek Galette